

Welcome back to our exciting series on stage lighting design! In previous parts, we covered the basics, introducing the concept of lighting and its objectives. We also discussed different types of lights, the controllable properties of light, and the importance of lighting angles, color, and lighting systems. Now, let's move on to planning your stage lighting design.
Planning Your Design
Theatre is a collaborative process – the relationship between the director, designers, crew and cast is important. Everyone needs to be speaking the same “language” when it comes to the production. It is important to establish a means of referring to the stage so that we all understand where the actors, props and furniture will be placed. One of the ways we do this is to divide the stage into virtual zones called “acting areas.” This grid divides the stage into a number of areas that we can refer to consistently so that everyone shares an understanding of direction and placement.
The number of acting areas on the stage will vary depending on the size of the stage, but as a typical rule, they are approximately 3m (10ft) wide zones. The stage is divided both horizontally and vertically and all the zones are names from the actor’s point of view, as they are looking at the audience. In European theatres, this convention is reversed, and the parts of the stage are named from the audience’s (or director’s) point of view. For the purposes of this post, we will be naming the areas as shown in the image below. This is not the only way of referencing the stage positioning, but it is the most common.

As a general rule, most lighting designs start with the designer reading the script, or in the case of a musical, reading the ‘book’ and listening to the score. The script is the starting point for you as the designer and will, as the design develops, become the main resource for all your lighting information.
Script reading is a bit like painting a picture – you start with the broad strokes, then you go over it again and add in any specific elements and then you go over it again and add in all the details. It is a good idea to read the script at least three times – the first time is simply to understand the story and learn about the characters, the period, and any other ‘broad strokes’ information that you can glean.
When you read it for the second time, you can start looking for some of the specific details that might be referred to in the text which will usually be in the stage directions. For instance, the opening stage direction might read: “The lights fade up slowly and we discover Susan sitting at the kitchen table bathed in the early morning sunlight”. Based on our objectives, it is a given that we will make sure we can see the actors and that we will do what we can to make them look well-sculpted and three-dimensional. When reading the script, we are looking for clues as to two of our other objectives – mood and information. We are looking for the ‘when and the where’ as well as the ‘how are they feeling.’ Remember, sometimes the clues will be in the spoken words by the actors and not in the stage directions – so skimming over the text just looking for the stage directions might mean that you miss some important bits of information!
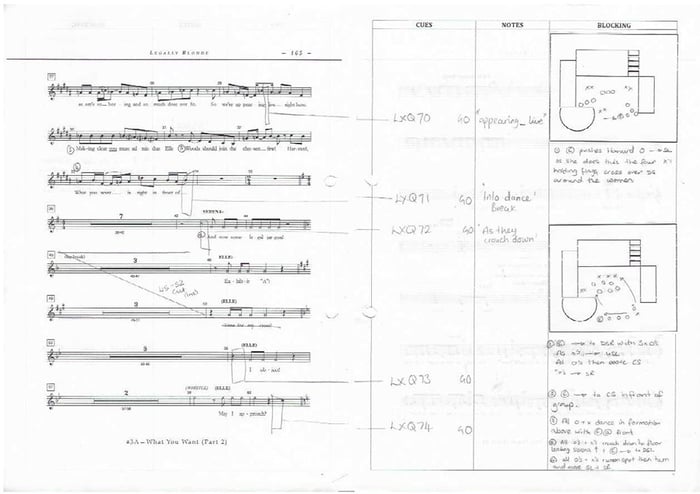
Top tip! Using small Post-It® notes to mark up the script is a quick way to highlight your cues. It also means that you can use different colors for different ideas, and if a cue moves, then you can just move the note.
When you read the script for the third time, you are looking more closely for other references that might offer up some clues about the lighting and that might inform some of the choices you make. Look at metaphor – does the playwright use weather or color to convey meaning? How can you pick up on these themes in your design? You might also start looking at possible blocking notes and mentions of entrances and exits – will these require you to do anything specific?
You do not have to sit down and read the script three times in close succession – in fact, it is probably better if you don’t! You may want to meet with the director and other designers after you have read it for the first time to talk about style and period and to get a sense of what the director’s vision for the play is – this is all information that will inform and affect how you read the script and what you might be looking for when you read it again. Start to make notes in your script about where you think cues might be placed and make notes about what each cue might do and what the mood of each moment might be. It is a good idea to find some visual references to help remind you of your ideas and make them easier to convey to the director and other designers.
Part of your preparation process should be attending rehearsals. This is where you will get a chance to see the blocking of the play and get a good sense of timings for your cues. You will also be able to clarify any concerns that you may have with the director or stage manager. You should also meet with the other designers (set, costume, and sound) and start to familiarize yourself with their designs too. Pay attention to the set design, study the plans and drawings, and be sure to let everyone know if you spot any potential difficulties as soon as possible. There will usually be a model box of the set too and this is a great way to get a really good sense of what the finished set will look like. Make sure that you have seen the costume designs as you want to be certain that any colors you decide to use will be flattering on the fabrics that the costume designer has chosen. It is worth talking to the sound designer too – perhaps they have some elements as a part of the soundscape they are creating that you will need to add to – is there a crack of thunder that might need a flash of lightning to go with it?
Lighting design is the most reactionary of the creative aspects of the show – you tend to make choices based on the decisions that have already been made by the other designers and director. Preparation is essential so that you are not caught by surprise.
Once you have a good understanding of the script and you have attended rehearsals, you will be in a good place to start planning your design in detail. Part of this process is the drawing of the actual lighting plan itself and the creation of all the associated paperwork. The lighting plan is a drawing (usually to scale) that shows the crew exactly which lights are going to be hung in which position. The plan will also carry other information like color choice, channel numbers and any other bits of information that the crew will need in order to be able to install the lighting correctly.
You have read the script. You have met with the director and other designers. Now what? Where do you begin? If you follow the objectives as the basis for your design, this will guide you in the placing of fixtures and selection of colors.
There are generally four elements to a lighting design:
• General cover
• Specials
• Set lighting
• Effects
The priority of these may vary slightly depending on the type of show you are doing, but if you follow this approach you can be sure of covering all your bases.
Top tip! When you are dividing your stage into acting areas, always try and get an odd number of areas from left to right. This way, you will always have a center area and we all know that the majority of important moments on stage happen center stage! This means that if you need to isolate the central area to help focus the audience’s attention, then you can do so using your general cover and you may not need to add a special to do this job.
General cover
 You know you need lights for visibility (face light) as well as some that will tick the ‘revelation of form’ box. A good starting point is to divide the stage into ‘acting areas’ and make sure that you provide good general cover for these areas. An ‘acting area’ is typically 3m x 3m (10’ x 10’). On your average stage, this will mean that you are able to divide the stage into nine acting areas.
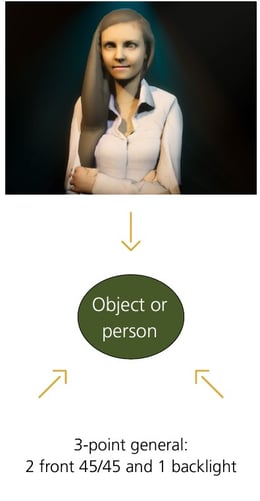
Each acting area should have at least one face light and one back light, but if it is possible, try to get two face lights (front 45/45) and a back light per area. This is known as a ‘3-point general’ and will give you excellent visibility and revelation of form – two of your objectives covered just by getting the general cover right! Remember when you are focusing, that you should allow for a little bit of an overlap between the areas so that you do not have any actors walking through a dark patch or ‘dip’ in the lighting.
Lights from the FOH bridges will most likely be profiles (like the ColorSource Spot V) and the back lights will most likely be PARs or Fresnels like the ColorSource PAR or Desire Fresnel. Using lights from the ColorSource family will ensure that you have full control over the color choices you make so it will be easy to adjust color to suit the mood of the play and you will not have to worry about ordering or cutting any gels.
Once you have placed your general cover, then you can start to add in the specials and any other lights that are over and above what you need for your general. The above process applies mostly to lighting plays. If you are lighting dance, then you would probably favor side light and back light and have less light in the FOH positions.
Specials
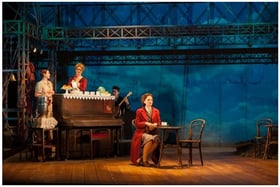
Now that you have your general cover taken care of, you can start to consider what, if any, specials you may need for your show. Specials are anything that fall outside of the general cover. For example, you may need to have a light focused to a specific place for the final monologue, or perhaps you want a window gobo to suggest time of day. Specials are there to help you tell the story and to take the design to the next level – lighting is about so much more than just a good general wash of light. If there are practicals on the set, then these are also considered to be specials and you should make provision for controlling them in your design. Practicals are lighting elements that the actors interact with – table lamps, chandeliers, wall sconces or other appliances – if it lights up or turns on, then you need to be able to control it!
A special is the theatrical equivalent of a close-up. In film or television, the camera is able to zoom in on what the director wants us to focus on. On stage, we use a special to highlight the actor (or object) that we want the audience to focus on.
Set lighting
 There are times when you will need to allocate some fixtures to specifically light the scenery – perhaps there is an odd shadow that you need to get rid of, or perhaps there is a doorway and you want some light to come streaming through. Once you have your general cover and specials allocated, then you can add in the fixtures that you will need here. It is worth noting that allocating lights for your cyclorama should be thought of as part of your general cover. As you tend to use floodlights or ColorSource Cyc units for this purpose, you can build this into your general cover as these units do not generally have a use outside of this application.
Effects
These are really the icing on the cake and unless they are specifically called for in the text, tend to be the last things that we add to our design. Smoke, haze, rain, fire, snow, strobes, etc. are all effects and should be used with caution. When you are adding in effects, always be careful that your lighting or effect will not distract the audience from the action that is happening on stage – lighting should always support the action on stage.
If you found this information helpful, don't miss our blog series dedicated to the art of stage lighting design, right here:
Stage Lighting Design, Part 1: Introduction to Lighting
Stage Lighting Design, Part 2: Objectives of Lighting Design
Stage Lighting Design, Part 3: Controllable Properties of Light
Stage Lighting Design, Part 4: Types of Lights
Stage Lighting Design, Part 5: Lighting Angles
Stage Lighting Design, Part 6: Color
Stage Lighting Design, Part 7: Lighting Systems
Stage Lighting Design, Part 8: Planning Your Design
Stage Lighting Design, Part 9: Getting Technical
Stage Lighting Design: Glossary
This blog series is an adaptation of our free digital guide, Stage Lighting Design: An Introduction, based on content written by ETC Outreach and Training Specialist, Declan Randall.
To enhance your understanding of lighting design, check out our complimentary digital guide, Stage Lighting Design: An Introduction, along with the accompanying posters. For more information about the diverse range of lighting products from ETC, visit etcconnect.com.