In this recurring series, Nick Gonsman of ETC NYC sheds light on aspects of the theory and practice of entertainment lighting control. Today’s topic: Cue transitions in a mixed-rig world.
An overly-dramatic intro.
Several weeks ago, I had the privilege to teach some control master classes at my alma mater – Penn State. We set up in the light lab, and like the many sleepless nights during my college career, I spent the afternoon hurriedly preparing things in the console to share with the class. In jostling through the tools we were set to go over, a scene began to play out before me in that dark lab:
To one side of the stage was me in 2005 – bathed in blue light, crunching a pile of looks into the desk, and then spending a ton of time and all the programming chops I had refining the transitions to be. just. so. How 2005 Me loved well-groomed transitions. On the other side of the stage was me in present time – naturally lit and seemingly going through the same actions (though with a lot less hair).
But halfway through the scene, Present Me looked up and paused thoughtfully with a raised eyebrow. All the cues looked the same as a decade before, but this time about half of the sources creating them were completely new. In the time that had passed between the two scenes, things had been irreversibly changed because of three words: Light Emitting Diodes.
How did my transition tools work now? How could I get my fixtures to behave together? The curtain fell, and the audience shuffled off listlessly to intermission – fraught over the unconquerable tasks the hero faced in Act II. Or maybe it was the line to the bathroom.
Here were two rigs for the same “show” – a decade apart – in the most aggressively changing time period for lighting technology on record. Was all my experience with refining transitions gone, because I now faced a mixed bag of electrical and digital fixtures? Or was lighting control following the same pattern as the rest of the world – where everything old is now new again? Let’s go over transition refinement tools traditionally associated with incandescent fixtures, and see how they may be able to help misbehaving LEDs.
Fade adjustment tools
1) Part cues.
For several decades, computerized lighting software has allowed for special handling of transition timing across different fixtures – called Part Cues. A cue with parts is basically several cues – all with their own timing information – that start their transition on the same Go.
When using a Part Cue, you can not only add transition timing, but you can also utilize Delays. These timing modifications on your LEDs can help fixtures that pop on and off near zero. Let’s look at an example:

In this show, my Cue 100 is a blackout. In Cue 101 my full stage look fades up in 7 seconds, including my LED cyc. But the issue that I am having is that the LED units pop on before my incandescents, on a mostly black stage. Up against a white cyc, this is a jarring way to come out of a blackout – not the smooth fade in I want. So let’s break the LED units into their own part:
[51] [Thru] [67] [Record] [Part] [2] [Enter], press [Enter] again to confirm.

Next let’s add a Delay to just Part 2, where the LED cyc units now live:
With Cue 101 selected, [Part] [2] [Delay] [2] [Enter].

Now, the LEDs will start their fading 2 seconds after the incandescents (which were left in Part 1). With a bit more light on stage when the LEDs come on, I’ve masked their jump from zero and hopefully made it less noticeable. Don’t forget: you can change the time of Part 2 to be 7 seconds just like Part 1, and the LEDs will finish 2 seconds later than the incandescents – or leave it at 5 seconds so they both finish fading at the same time (or any other combination you prefer). Don’t forget to label the parts for context.

The Hide Your Part Cues Gray Box.
Don’t want your stage manager panicking over the 18 parts you have in every cue? Before you go into run, click on the gear in the same frame as your PSD tab, and uncheck “Display Cue Parts”.
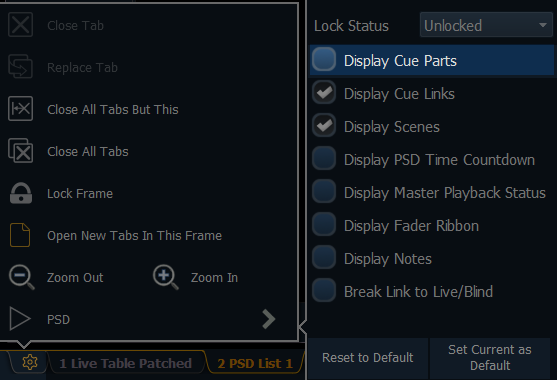
Your SM will only see the main cue and its label, but you’re a seasoned lighting professional – so you’ll notice the superscript denoting the number of parts hiding below.

2) Discrete timing and delay.
Discrete Timing functions similarly to Part Cues, except that it won’t go telling the whole cast what you’ve been whispering under your breath at the tech table. With Discrete Time and Delay, the timing lives on the channel – not on a cue level like Part Cues. Let’s run through the same example.
We want to delay our LED cyc units, so type [51] [Thru] [67] [Delay] [2] [Enter]. You will see a red ‘t’ next to the modified channels:
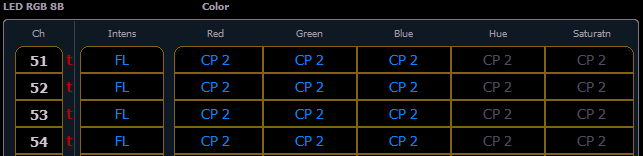
If you hold the [Time Display] button (the half-moon buttons above your intensity wheel on @5, Gio, and Ti – or [Shift] & [Time] on Ion) – the desk will display Discrete Delay/Time. You will see there is a 2 second delay, but no discrete time – meaning the channels will follow the cue time for fading:
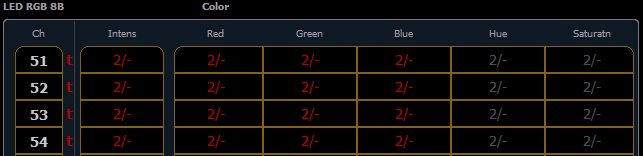
Remember to [Update] [Enter] to save the Discrete Delay to the channels:
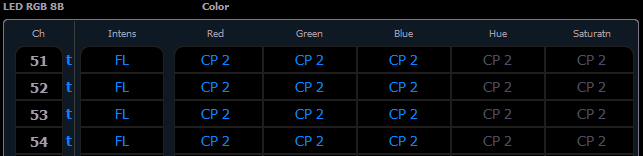
Notice in your cue list that you do not have parts, but you do have a ‘+’ where discrete timing is stored:
![]()
Just like our Part Cue, the channels will start their fade up 2 seconds after the incandescents have started – note your duration column indicates a 9-second total transition time.
Which should I use – part cues or discrete timing?
Nowadays, it is purely an organizational choice.
Part Cues make it easier to quickly see the chunks of timing that you have broken out, and you can give them a meaningful label. But Discrete Timing allows more flexibility when the timing you need is widely varied (like a fanned time) or only on a few channels. Use one, use both – they are not mutually exclusive.
3) Curves.
We’ve looked at a few options that change when problematic LEDs fade, but what if we want to modify how they fade? A Curve gives you the ability to change the characteristic of a fade as it moves through its time. “Thanks for the technical jargon Gonsman, but what the Trace Cue Only does that mean??” Curves have been around a long time – we should explore their history before trying to solve our issues with a modern rig.
The Oversimplified History Of Curves Gray Box.
Since the dawn of electric lighting, designers have been choosing a fixture for a particular purpose based on the quality of light it will produce. And as you know, even the most basic show will require several systems and the odd special or two – so the diversity of fixtures being put into a rig can grow quickly. At the same time, manufacturers were designing fixtures to fit designers’ requests – such as brightness, quality of light and features, and efficiency – all while avoiding the pesky patents of competitors. In doing this, they created a myriad of fixtures whose lamps were of varied wattages and filament lengths – all being placed into the self-same rig described above.
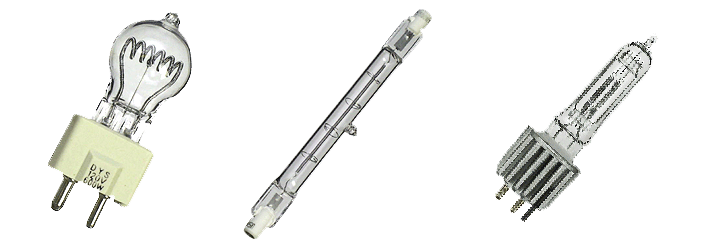
And while the subtlety of a 20 watt bulb contrasted with the power of a 10kW fresnel blasting through an upstage window makes for a great static stage picture, the filaments were essentially burning hunks of metal. And as such, when fading all the fixture types together – particularly to or from zero – they wouldn’t fade the same.
Why? It’s because Physics is pretty much the worst. Without going into an Inception-level of blog posts inside of other blog posts, there are oh-so-many things that affect how a filament behaves. Variations like the length of the lamp’s filament, the wattage it consumes, its temperature, the speed at which you are trying to fade it, the materials it is made from – all of those influence why two lamp types might not fade the same. And those are just variables inside the lamp. Don’t get me started on dimmers and power distribution. Please… really… don’t.
Designers compensated for these issues by having operators move one dimmer handle a little faster at the bottom of the fade than other fixtures, or maybe a little slower near the end. And as computerized lighting systems came into theaters, the developers created options to modify the characteristic of a fade in a similar way. The Curve* was born, and transitions have become more manageable.
*Curves are often still referred to as “Profiles,” but that word has migrated in meaning with the introduction of moving lights and smart fixtures. The Profile now refers to the fixture definition.
Now that we know The Complete History Of Curves, Abridged™, what do they look like in modern software? If you’ve always made the assumption that a cue starts its fade, and marches at the same even pace until it finishes, you would be right – that is the default fade behavior. But it has a fancy name: a Linear Curve. And it looks like this:

Pretty straightforward – at 10% of the fade (labeled “Input”), the board is outputting 10% of the final level (labeled “Output”). At 50% of the fade, 50% of the level. Etcetera. But as we now know, 10% of one light may look completely different than 10% of the light next to it. So Curves are adjustable.
Let’s think about our 10kW Fresnel that needs a little help getting warmed up and pushing light out in a quick fade from black. How about a Fast Bottom Curve? Push a little more juice at the beginning of the fade to help the big gal out:

As you can see, at 5% of the fade, the console is going to send 10% of the level out to the fixture. At 15% of the fade – 29% output. And after half the fade, it starts to even out again – gliding along pretty linearly until the fade is complete.
How about that 20w bulb that pops on too fast for our 10kW friend? Let’s look at a Slow Bottom Curve:

Same song, different verse. The console will withhold some of the output at the beginning of the fade – so it takes 20% of the transition time to get above 10% output to the fixture. It crosses 50% pretty evenly, and then speeds up in the top half of the fade to recover the lost points. This also would help, say, an LED fixture that pops on too soon, and needs to hang out a little before appearing on stage.
And while we’re on it, what if you have a totally weird fixture that needs to be off at full, but on at zero? An Inverted Curve can assist:

As you can see, Curves don’t change when a fade happens in relation to other fixtures in the rig – like Part Cues and Discrete Delays – they change the characteristic of the fade, regardless of time.
In Eos Family software, you can set a Curve in Patch, and that fixture will always use that Curve: [Patch] {Attributes} [Chan 101] {Curve} [901] [Enter]
You can also add a Curve to a cue, and all the intensities will use that Curve for just that cue: [Cue] [100] {Curve} [901] [Enter]
Oh, you’re feeling spicy? How about you move channels into a Cue Part, and put a Curve on just that Part, affecting only those channels: [Cue] [101] [Part] [2] {Curve} [901] [Enter]. This will apply the Curve to all the parameters of those channels – which is fine for an LED fixed-focus unit. But if you are trying to correct a mover, you many want to only move channels’ intensities to the Cue Part with a Curve.
Now look at those LEDs purr. Remember – Part Cues and Discrete Timing affect when certain fixtures fade, and for how long. Curves affect how channels fade. They’re all great programming nuances that have long fixed incandescents, but are swell for ornery LED fixtures, too.
4) Let’s get physical. physical.
As you’ve likely gathered by now, LEDs tend to have the most difficulties fading to and from zero. And if you have not already, at some point you’ll use a fixture where a Curve doesn’t help the “pop,” and you need it on stage before its fade can be masked by other units – rendering Parts and Discrete Delays useless.
Suppose you’re lighting a piece with a sunrise – and your LED cyc units are going from zero to 15% over a minute. You’ve tried all your programming options and the fixtures still pop at the bottom, and feel steppy throughout the fade. What’s a technology-embracing-LD to do?
Don’t fade the light from zero to 15% where the fixture is struggling. Throw a layer or two of good ol’ full-stop Neutral Density gel over your fixtures, and fade the LEDs in a higher range. The ND will block the bottom end of the fade, masking the nasty parts and allowing the visible output to come from a smoother range in the fixture.
Gel being used to make LEDs fade better? Sometimes the old tricks are still the best.
The “My LED Still Won’t Dim And My Console Is Junk” / Gonsman Soap Box Gray Box.
It is always a tough conversation when someone just wants their LED to fade like an incandescent, and it is not cooperating. It is important to remember that LEDs are complex digital devices. At their core, LED units are really made up of two components: the emitter and the driver.
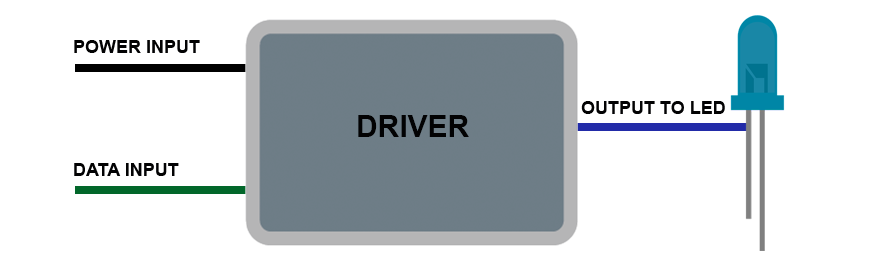
The driver is the one that is actually doing the hard work. It needs to take power and data and convert them into a signal that allows the emitter to turn on, and – in the way we use them – to dim. Unlike our burning hunks of metal from the electrified lamps, LEDs are digital, and many of them don’t actually like to dim. Lots of engineering is required to get these two devices to be simpatico – not only are there considerations about the electrical capacity of the emitter, dimming drivers need highly specialized firmware to make them dim smoothly.
So, here’s my soap box. *puts one foot on box*
You’ve installed your system according to DMX-512-A rules. You have deployed programming tricks like timing adjustments and curves. You have tried various DMX speeds. You have done your due diligence in making sure the LED unit is getting the right and best data possible. And it still has pop or flicker problems at the low end of the fade.
It is very easy to look at the most complex component in the system and point the finger. Not to say a console can’t have flaws – but do not overlook the importance of the quality in engineering of the driver as it relates to the emitter its pushing. And it can have nothing to do with cost – I have had LED tape from the internet have beautiful fades to and from zero, and I have seen professional-grade fixtures where the bottom end of the fade was not prioritized in its development.
*puts second foot on box, stands tall*
If you’re looking to purchase LEDs and the fade to/from zero is important to you, get a demo in your space and on your control system. If you’re making an LED component for your show, buy samples and test them before doing a full deployment (including line-voltage dimmed drivers/emitters).
No, a trade show floor is not an acceptable place to judge the nuances of a minute-long fade to/from zero. No, you can’t just watch a YouTube video of it fading. You’d be upset if you bought a car without a test drive, only to find out that the brakes engage when it slows below 10 MPH. Be a smart consumer and put it through its paces with realistic production-like testing before you make a purchasing decision.
Anyway – that’s my personal take based on a lot of experience with these sorts of issues, both in my work at ETC and out on gigs. I’ll step off the soap box. It’s pretty heavy – I’ve got to stop carrying it around.
Outro.
As it turns out, a lot of the features that we have long used to manage incandescent fixtures with various filaments are quite appropriate for assisting our new digital companions. I used Eos Family software in this post to construct our examples, but most modern lighting consoles have some variation on these tools – including Cobalt and Hog 4. Being comfortable with these features can save you a ton of time when problems come up in the heat of battle. In preparation: know how each tool is different and can help you, be smart and judicious in ensuring your LEDs are capable of the type of dimming you expect them to perform well before you get into tech, and, most importantly, keep lots of ND around. You never know when it will be the best solution of all.
Like what you saw? Did I mess something up? Got something you want to know more about, or have a tip to share? My inbox is always open: nick.gonsman@etcconnect.com.

%20(1).jpg)