Welcome back to our ongoing series on stage lighting design! In the previous installments, we set the foundation by introducing the concept of lighting and exploring its objectives. We also delved into the various controllable aspects of light, examined the different types of lights available, and considered the importance of lighting angles. Now, let's explore the realm of color and its pivotal role in creating a captivating stage lighting design.
Color
 Before we start to look at how we use color on stage, we need to take some time and look at how color works.
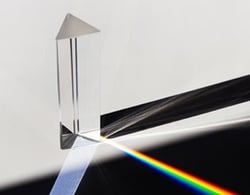
When we talk about color and color theory, we use white light as our base point, and when we think of ‘white light’ we use noon-day sunlight as our reference point. We have all seen the image of Newton’s famous experiment where white light was passed through a prism and it diffracted into the colors of the rainbow.
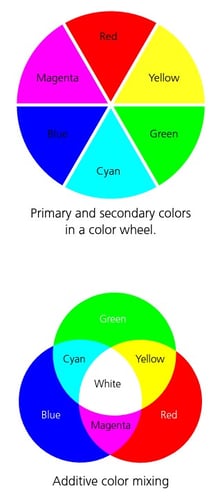
From this experiment, Newton determined that white light is made up of seven basic colors: red, orange, yellow, green, blue, indigo, and violet. These seven colors have been further distilled into three primary colors, namely red, green, and blue.
The primary colors of light are red, green, and blue. You may have already come across this before – your TV screen, computer monitor, and all the screens on your devices use this principle. Some of the more basic LED luminaires also use this color model. The reason we refer to these colors (often written simply as RGB) as the primary colors of light is because, if we mix these three colors together, they form white light.
If we mix any two of the primary colors together, we will get a new color – and this is called a secondary color. If we mix red and green light, the result is yellow. Mix red and blue, the result is magenta. Mix green and blue light and the resulting color is cyan. Cyan, yellow, and magenta are the secondary colors of light and are often expressed as CMY.
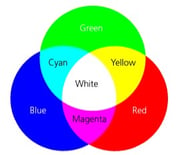 A unique relationship exists between the primary and secondary colors. The primary colors of light are the secondary colors of pigment, and vice versa. If you think about the ink cartridges in your ink-jet printer, they use cyan, yellow and magenta as the basis for their mixing system. Similarly, mixing two of these primary colors together creates a secondary color. For instance, mix yellow and magenta and the result is red.
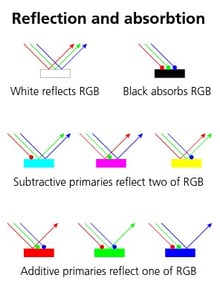
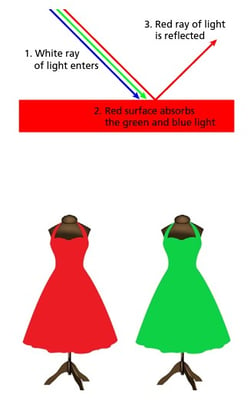 Knowing that white light is in fact made up of several different colors, let’s examine how our eyes see color. We have already learned that our eyes only see the light that an object is reflecting back towards us. So, let’s take a red dress and shine white light at it. What is happening? The dress is absorbing the blue and green portions of the light and is only reflecting the red light back to us, so the dress appears to be red. If we shine white light at a green dress, it will absorb the red and blue portions of the spectrum and only reflect the green light back to us. If, on the other hand, we shine green light at the red dress, the dress will absorb all the green portion of the light, and because there is no red light to reflect, it reflects no light, so appears to be black.
To illustrate the above concept, you can take a piece of red lighting filter (called “gel”) and look at the dresses on the right. Notice how they change? You can do the same with a piece of green gel.
Color mixing
 When we talk about ‘color mixing,’ there are two types of mixing that we refer to – Additive and Subtractive color mixing.
Additive color mixing – this occurs when you have more than one light, each in a different color, focused onto the same area. This is most prevalent on cyclorama lighting where you traditionally have floodlights in red, green and blue (or a different combination of colors) and you use these to mix the different colors on the back cloth. LED fixtures also use additive color mixing – typically based on the RGB color model. Even though all three colors are housed within one luminaire, it is still additive color mixing at play as you are able to control the three colors separately. We call it additive mixing because as you mix new colors each new color is less saturated than the original colors – in other words, you are working towards achieving white light.
In reality these days, most LED luminaires have more than just RGB sources as the base of their mixing system, some manufacturers add a white LED, others use different colors and some of the luminaires made by ETC use eight different colors in the mixing system – but irrespective of the number of colored emitters, it is still additive color mixing.
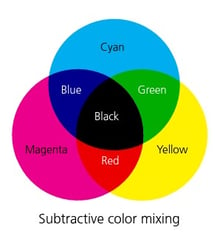 Subtractive color mixing – this occurs when you have one light source and you add more than one color filter in front of it. It is called subtractive mixing because each new color will be more saturated than the original – in other words, you are working towards black. You are most likely to encounter this type of color mixing system in moving lights (that use a white light engine) or if you want to mix your own new color by adding two pieces of filter together.
The Sola Family fixtures from High End Systems use a subtractive mixing model.
Additive color mixing uses the RGB system as a base and subtractive color mixing uses the CMY system.
 When we think of additive color mixing, we think of using the primary RGB system, but in reality there are usually more than just those three colors used in an LED fixture. The ColorSource range of fixtures from ETC uses RGBL (Red, Green, Blue, and Lime) as the base. Other fixtures might substitute the Lime for White (RGBW) or even Amber (RGBA), but there will always need to be at least red, green and blue present in the color mix system if you are going to be able to mix your favorite colors!
Now that you understand the basic principle of color mixing, let’s take another look at our red dress example. If we shine Yellow light at the red dress, what color do you think it will appear? The answer is RED. Yellow light is made up of red and green, so the dress absorbs all the green and only reflects the red light back, appearing red.
If we have a green dress and we shine cyan light at it – what color do you think it will appear to be? Green, of course! Cyan is made up of green and blue light, so the dress absorbs all the blue light an only reflects the green light back to us.
 To illustrate the above concept, you can take a piece of yellow gel and look at both dresses again. You can do the same with a piece of cyan gel.
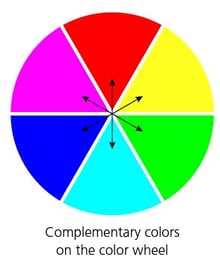
Complementary colors
When we speak of color, we tend to talk about primary, secondary and complementary colors. Complementary colors are colors which are opposite each other on the color wheel that, when mixed together additively, form white light.
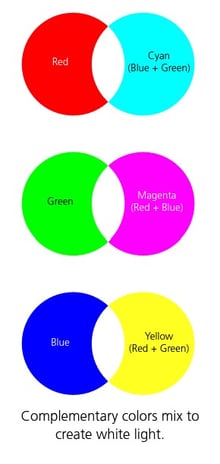 Red and Cyan are complementary colors – if we mix red and cyan together additively, we will get white light. Why? Well, cyan is already a mixture of green and blue light – so by mixing red and cyan, we are in fact mixing red, green and blue together – so we end up with white light. Other complementary colors are:
Blue and Yellow: blue + yellow (red & green) = white
Green and Magenta: green + magenta (red & blue) = white
We can change the color of light in two ways, by either adding a filter (or ‘gel’) to the light, or by using the LEDs built into the light to mix colors additively.
Gels change the color of the light by absorbing the portions of the spectrum that are not wanted and only allowing the color we want to transmit through the filter. If we use a red filter, the filter will absorb the green and blue portions of the light and only allow the red light to pass through.
LEDs change color by varying the intensity of the red, green and blue emitters within the light.
Color and your objectives – Like intensity, careful use of color can also help you achieve your five objectives.
• Visibility. Paler colors will aid in visibility and make skin tones appear more natural. Darker colors emit less light, so the darker the colors you use, the less light there will be on stage. Remember the principles of reflection and absorption – darker colors will also reflect less light.
• Revelation of form. Using color to fill in your shadows is a great way to create depth and make things look wonderful.
• Composition. Using colors that complement each other will create pleasing looks on stage.
• Mood. Color is a wonderful way to help convey mood and emotion to the audience.
• Information. We use color to help tell us time of day and location – perhaps a dark blue to suggest night time, or a pale gold to suggest the rising sun.
Selecting colors
One could argue that the introduction of LED technology has actually made the process of selecting colors for your show more difficult. While it is physically easier to select and change colors from the lighting desk, it is much harder to test colors in advance.
When using gels to add color to your rig, you could use the swatch book from your favorite filter manufacturer and hold it up and look at the set model or costume swatches to see the result. This method does not really work when using LED. Let’s start by looking at color filters and then we will look at how our method changes when working with LEDs.
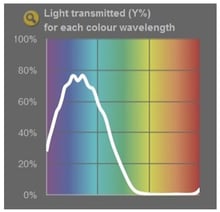
When looking at your filter swatch book, you will see that for every color swatch, there is a transmission curve graph. These can be really helpful when selecting colors for your show. The graph shows you the amount of color that each gel will transmit. The numbers on the X-axis represent the color in wavelength (based on the electromagnetic spectrum) and the Y-axis is the percentage of that color transmitted by the filter.
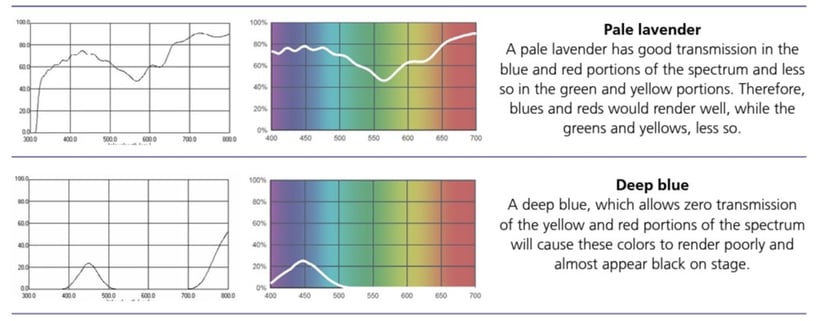
By reading these graphs, we can quickly determine whether a particular filter will work for the show. If the set and costumes have a blue bias, then using colors that have low amounts of blue in them will render them looking dull and lifeless. Conversely, colors that have a high blue content will make them come alive on stage.
Another method would be to use a torch and shine the light through the filter at the set model or costume fabric. The pitfall here is that you need to make sure that the torch you are using is the same color as the lights you will be using in the theatre. Most LED torches use a cool white LED, so the colors will not render accurately if you are using tungsten sources in the theatre. Tungsten light is much warmer, and this will affect the color the filter produces.
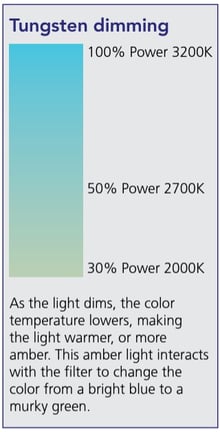
 If you are using tungsten lights in your design, you need to keep in mind when a tungsten light dims, it gets warmer, or more orange. This change in the color of the light (referred to as “color temperature”) will have an impact on the colors you choose. For example, if you select a blue filter that has a high green content, when the light dims, the light will shift from blue to green. This is known as “amber drift” or “red shift.” This change in color temperature can result in some unexpected changes, so giving some thought to what might happen to the color as it dims is important.
 When working with LED sources, the problem caused by amber drift can be avoided. When LED dims, it does not, by default, change color or get warmer. This means that you can maintain your selected color throughout the dimming cycle which means there will be no big color surprises as your lights fade out at the end of the scene. Some LED luminaires (like the ETC Source Four Series 2 Lustr) have a function called “red shift” which deliberately introduces this color shift into the light as it dims. If you want to emulate the effect of a tungsten light when it fades using LED, then you can turn this feature on in the fixture menu.
While it is not as easy to test colors in the model box when using LED, it is much easier to change colors while you are programming. Most consoles have color libraries built in and changing the color is as easy as scrolling through the library and choosing the color you want.
While you are finding your way in lighting design, don’t be afraid to experiment with color – it’s the best way to learn and find out what works and what doesn’t. Using your knowledge of how color works will get you started. Using your keen eye and sense of good taste will do the rest.
If you found the information on color in this post useful, keep an eye on our blog for more valuable insights and tips on stage lighting design. Coming up in Part 7, we will explore the subject of lighting systems. For a more content like this, take a look at our free digital guide, Stage Lighting Design: An Introduction, which is available alongside a set of complementary posters. Additionally, visit etcconnect.com for details of the wide range of lighting products manufactured by ETC.
Missed the previous posts in this blog series? Check them out here:
Stage Lighting Design, Part 1: Introduction to Lighting
Stage Lighting Design, Part 2: Objectives of Lighting Design
Stage Lighting Design, Part 3: Controllable Properties of Light
Stage Lighting Design, Part 4: Types of Lights
Stage Lighting Design, Part 5: Lighting Angles