

Welcome back to our stage lighting design series! In the previous parts, we laid the groundwork by introducing lighting and discussing the objectives of lighting design. We also delved into the controllable properties of light and explored the different types of lights available. Now, it's time to take a closer look at lighting angles and how they play a crucial role in creating the perfect stage lighting.
Lighting Angles
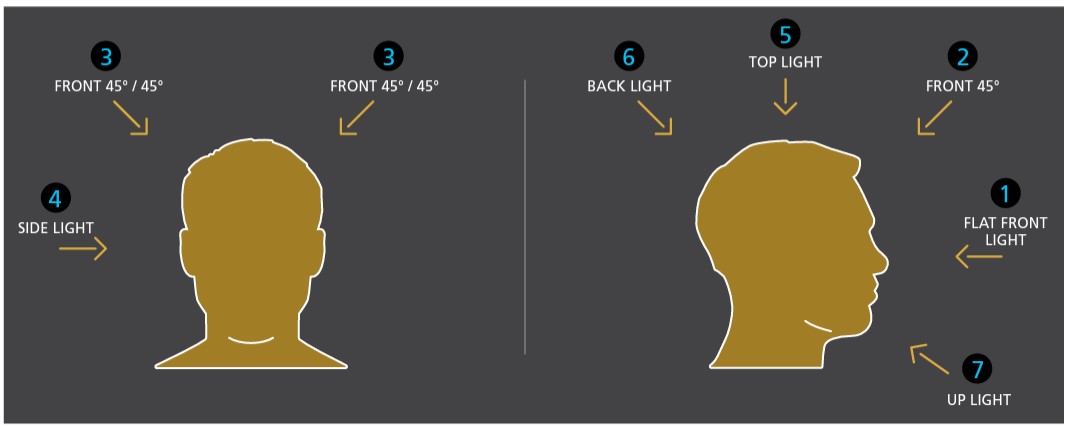
Understanding the different kinds of lights that are available is only part of the process. Once you know what lights you have available, you need to decide where to position them in the lighting rig. We refer to the positions that we hang lights in as the ‘lighting angles’ and there are five basic lighting angles that you are most likely to use in your show. The lighting angles refer to the light’s positions relative to the actor.
- Front light
- Back light
- Side light
- Top light
- Up light
Since visibility is our primary objective, we will start by looking at the angles that offer the best visibility and then start to look at how variations on the position of the light introduce shadow and how that achieves the other objectives. There are a few variations on ‘front light’ each giving slightly different results.
1. Flat Front Light
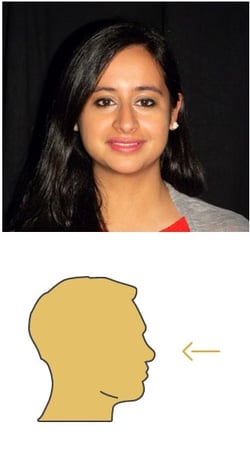 This is light that is placed directly in front of the performer at eye-level (or as close to as possible). This angle is rarely used for face-lighting. In most theatres, lights that are rigged on the balcony or circle rail would fall into this category.
Advantages:
This angle offers good visibility as there are no, or minimal, shadows on the actor’s face. If actors are wearing hats, it can be helpful in getting light under the brims of the hats, eliminating strong shadows on the face. It is an optimal position when using projections as there will be minimal image distortion.
Disadvantages:
When lighting from this position, it is almost impossible to prevent the huge shadows of the actors being cast on the set or the background which will be very hard to get rid of. When actors or objects are lit directly from the front, they can appear flat and two-dimensional. This is also a lighting position that is not always available in all theatres – it is usually only available in theatres that have balcony seating.
Because the large shadows cast by the actors will be very hard to get rid of, we want to try and avoid creating them at all, so we tend to elevate the lighting position in an effort to minimize the shadow cast by the actor. The greater the angle of elevation, the smaller the shadow cast by the actor becomes.
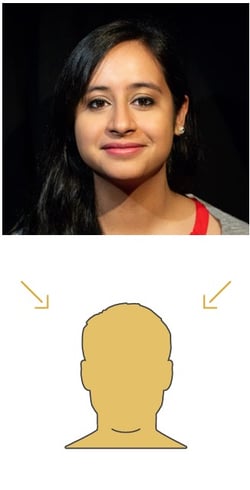
2. Front 45º
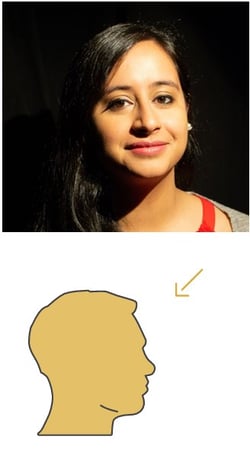 Since most theatres may not have a lighting position that would provide the ‘flat front’ position, and seeing as it would result in harsh shadows, the majority of front- or face-light in theatres comes from a slightly more elevated position. By lifting the lights up to an angle of approximately 45° above the eye line of the actor, we are able to achieve a light that offers good visibility while offering a reasonable containment of the shadow that the actor is casting behind them.
This angle also more closely resembles the light that is cast by the sun, so it looks quite natural on stage. By lifting the light up, we start to introduce some natural shadow on the actor’s face; slightly under the nose and chin. We know that shadow is what contributes to the revelation of form objective, so this actually works in our favor.
This is the most common lighting position in proscenium arch theatres. These are the lighting positions in the auditorium and are sometimes referred to as FOH (Front-of-house) bridges. It is an optimal lighting angle for front light, and where possible, we try to achieve this position irrespective of the stage or theatre layout.
Advantages:
As this is a lighting position that is readily available in most theatres, it is easy to access and will provide good front light coverage. It offers good visibility and due to the small amounts of shadow that it introduces to the face, it also helps to shape the face, so we are starting to achieve our ‘revelation of form’ objective. By hanging the light in an elevated position, we have also reduced the shadow behind the actor and this is now contained to the stage floor, which is easier to manage and looks more natural.
Disadvantages:
Even though we have introduced some shadow, it is possible that the actors might still appear a little ‘flat’ on stage.
3. Front 45º / 45º
 Whenever it is possible (depending on available equipment and rigging positions) we tend to elevate the light to a 45° angle and we also offset it by 45° to the side. This position is then mirrored so that we have a matching light from the other side – in other words, we are lighting our actor from two sides at the same time – something known as the FRONT 45-45 which is based on a lighting principle developed by Stanley McCandless (first published in 1932). Typically, one light is colored as a “warm” (pale amber) and the other as a “cold” (pale blue).
The same FOH lighting positions are used here that you would use for the single Front 45 approach.
The 45° elevation offers good visibility. By moving the light 45° off its axis, you are introducing more shadow on the face, so the revelation of form objective is also achieved by this position.
Advantages:
This system is favored when lighting plays, where visibility and the ability to see the actors’ faces clearly is essential. The 45° angles offer great visibility and the two different color tones shape and mold the face, providing good revelation of form too.
Disadvantages:
It is possible that there may still be some unwanted shadows cast on the scenery, particularly upstage. It also may not always be possible to achieve the 45° offset for all units from the FOH bridges as this would require the bridges to be wider than the auditorium. Lighting design is not just about visibility. It is also the responsibility of the lighting designer to make sure that the actors (and scenery and costumes) look as good as they can (or even better than they actually are!) and, that they appear to exist as three-dimensional objects in a space. Front light offers us good visibility, so let’s look at some lighting angles that focus more on the ‘revelation of form’ objective.
4. Side Light
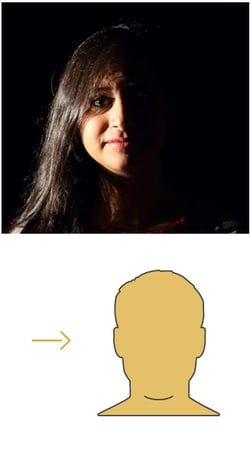 Because it only lights one side of the performer, casting the other into full shadow, side lighting has wonderful sculpting and molding properties and as such, is the favored angle when lighting dance.
Side lighting is usually rigged on booms, or “trees,” in the wings on the side of the stage, and it is not uncommon to have multiple fixtures in each location. It is also possible for side lighting to be rigged on a floor stand and these are affectionately known as “shin-busters” (or just “shins”) – just ask any dancer who has ever run off into the wings!
Usually, profiles (ellipsoidals) will be the light of choice for side lighting, as you have the most control of the light. By using the internal shutters you can cut the light off the floor completely to create a “floating effect.” You are not limited to the use of profiles in this position, you can also use Fresnels or PARs, but you sacrifice some degree of control over the beam quality. LED battens like the ColorSource Linear, when rigged vertically, are also very effective as side lights.
Advantages:
While this angle offers a degree of visibility, its primary advantage is its sculpting properties. Side light creates strong shadows and this high contrast gives perfomers or scenic objects a real threedimensionality, enhancing their form. Shadows from side light, when rigged on booms, falls into the wings on the opposite side of the stage, so you do not have to be as concerned about shadows falling on the scenery.
Disadvantages:
If your only source of light is side light, you may run the risk of the performers casting shadows on each other, when they are standing in front of the light. It is rare that a single side light will be your only source of light on stage, so the overlap from the other beams of light will help to alleviate this problem to an extent.
5. Back Light
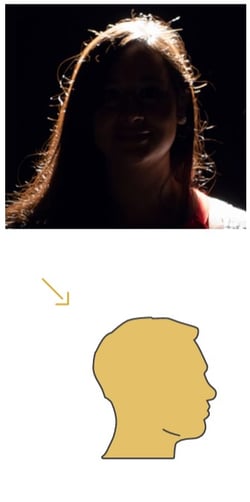 Lighting actors from behind is one of the most effective ways to ensure that they appear as three-dimensional objects on stage and do not blend in to the background. Back light creates a halo effect around their head and shoulders which gives them form, shape, and separates them from the scenery. Back light helps create depth on stage.
Another of our objectives is mood – back light is a wonderful tool for creating mood onstage. You are able to introduce more saturated color into the back light as this will not have an impact on skin tones. Also, the principle of ‘angle of incidence equals angle of reflection’, means that it is the back light color that the audience will perceive, as this light is reflecting directly from the stage to the audience, so changes in the back light color are noticeable and a great way to change the mood of the scene.
Back light is usually rigged on the overhead lighting bars, and where possible, is positioned so that it is approximately 45° behind the actors so that it is a mirror of the front light position. Of course, in practice, this is not always possible as there may be limitations due to the location of the lighting bars or scenery.
Advantages:
Back light provides excellent sculpting on stage and should be considered an essential part of any design. Back light can create a sense of depth on stage and is a good way to introduce more saturated color into the lighting design without there being an impact on skin tones. Back light is more readily perceived by the audience as it reflects off the stage floor, so it is a useful way to change the mood on stage. We will look at how color can be used to change mood in the Color section.
Disadvantages:
Back light offers little visibility in terms of face light and it is rare that it is used in isolation, although sometimes a striking silhouette is called for. Back light can result in some dramatic shadows on the floor in front of the actors, and care should be taken when focusing to ensure that it does not shine into the eyes of the audience in the first few rows of the theatre.
6. Top Light
 Top light has the advantage of being the most contained when it comes to shadows. With the light directly above the actor, the shadow is cast directly below them, so you don’t have to worry about shadows on the set or backcloth. Top light offers similar properties to the back light in that it offers some good sculpting qualities, but it will cast big shadows in the eye sockets and under the nose – making the eyes and mouth difficult to see. Top light is usually reserved for ‘specials’ as it is an effective way to isolate someone on stage. When used at high intensities, it can result in shadows on the actor’s face that are slightly unnatural and are difficult to get rid of. Saturated color can be used in top light if used carefully and sparingly. When plotted at high intensities, some light will be reflected off the floor and will light up under the actor’s chin.
Advantages:
Top light provides a contained light with minimal shadows on the stage floor. Depending on the finish of the floor, it sometimes reflects to cast a soft up light on the actor’s face. It offers some sculpting properties similar to a back light, but should be used sparingly. If you are lighting a traverse, thrust, or theatre-in-the-round stage, top light tends to replace your back light as a way of introducing more saturated color.
Disadvantages:
When used at high intensities, it can cast strong shadows on the face which can be difficult to eliminate.
7. Up Light
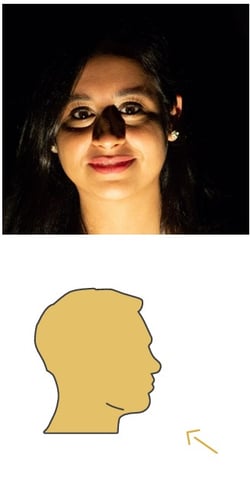 Up light is typically reserved for effects, whereas in the days of gas lighting, it was the primary angle used as the gas lamps would be found along the front edge of the stage and would up-light the actors. This angle is not common these days, and when used in this position, is referred to as ‘foot lights’ or simply ‘foots.’
The light cast by an up light does not look natural at all – this is because we are used to our light sources typically coming from above – think of the sun or the lights in the ceilings of our homes or offices. Light from above is something we have become accustomed to, so when it comes from below, it looks unnatural and almost scary – I am sure we have all scared our little brothers and sisters by holding a torch under our chins and leaping out of the dark!
Up lights are typically found along the front edge of the stage. Some stages may have special slots in the stage floor to accommodate foot lights, and sometimes it is up to the set designer to incorporate a space for them in the set design. It is not uncommon for the lights to be secured to the front edge of the stage where they are visible to the audience. Footlights tend to be smaller fixtures as they need to be able to fit into small spaces and not block the audience’s view of the stage. Battens like the ColorSource Linear can also be used as footlights. Not all up lights have to be placed on the front of the stage. Any position that will result in the actor being lit from below is considered to be an up light.
You may be wondering “if this looks so unnatural, why would I use it?” There are a couple of instances where up light can be really effective. If your actors are wearing wide brimmed hats, then using some up lights at a low intensity is another way of eliminating shadows on their faces cast by the hats. Thinking about our objectives, information, and creating suspended disbelief, is one that we are also working towards. Let’s imagine that you are lighting a scene that is taking place around a camp fire – by using footlights you are recreating the effect of the flames from the fire by lighting faces from below – add an amber filter and a flicker effect and you have achieved a realistic effect of someone sitting beside the fire!
Advantages:
Up light is often used to create dramatic effects and can be helpful when you deliberately want to cast shadows on the background. It is a useful angle when creating firelight effects on stage. When used at low intensity, it can be helpful in removing shadows on actors faces caused by wearing hats.
Disadvantages:
Up light can look very unnatural when used in isolation or at high intensities and will result in large shadows being cast on the background which, if not intentional, can be very difficult to eliminate.
The lighting angles listed above are not exhaustive, but form the basis of any lighting rig. There can be variations on the angles depending on the requirements of the show, the design of the set, and the limitations of available rigging positions in the theatre. It is also possible to combine some of the angles to create alternatives – for instance, it is possible to move the back light to a 45° off center (as we do for our front lights) – resulting in a diagonal back light – an angle which is popular when lighting dance. We have already talked about side lights which are rigged on the ends of the lighting bars – this is effectively making them a 45° side light and is called a pipe-end. Below is an example of combinations of lighting angles as you might expect to find them on stage.

Distribution and the objectives – Carefully choosing your light, its place and its focus, you can make sure that you have covered the visibility, revelation of form, and information objectives. By adding color you can start to cover the mood and composition objectives as well.
- Visibility. Ensuring that you have a good front-light coverage of the stage is the key to being able to see the actors. Front-light (flat front, front 45° or front 45°/ 45°) and side light are good choices here. Using lights that offer precise beam control is also helpful. Profiles (ellipsoidals) are typically used for this purpose, although it is not uncommon to use Fresnels too.
- Revelation of form. Careful placement of the FOH lighting can help achieve this, but it is usually also accomplished with back light, side light, and top light. Depending on the area you need to cover, you can use profiles, Fresnels, or PARs.
- Mood. Although mood is largely achieved through use of color and intensity, the types of lights and how they are focused will also have an effect. Steeper angles with more dramatic shadows will portray a different mood to those with softer, more evenly illuminated areas. Similarly, tighter areas of light will have a different feel to broader more open areas.
- Information. The choice of instrument and its focus can contribute to the setting of the scene. If you want to introduce any form of projected image, a profile will be the only choice. The angle that the light strikes the stage (or actor) can also convey information. Steeper angles might suggest mid-day sunlight while lower angles might invoke the feel of a sunset. Broader areas of coverage would be more suited to suggesting sunlight, while a more contained light might be used to suggest the pool of light beneath a street lamp, for instance.
- Composition. All of the above elements work together to create the overall composition of the lighting state on stage.
If you found the information on different lighting angles in this post helpful, be sure to keep following for more valuable insights and tips on stage lighting design. In Part 6, we will explore the fascinating world of color. For a more in-depth understanding of stage lighting design, don't forget to check out our free comprehensive digital guide Stage Lighting Design: An Introduction, and a set of accompanying posters. Also, visit etcconnect.com to explore the extensive range of lighting fixtures manufactured by ETC.
Missed the previous posts in this blog series? Check them out here:
Stage Lighting Design, Part 1: Introduction to Lighting
Stage Lighting Design, Part 2: Objectives of Lighting Design
Stage Lighting Design, Part 3: Controllable Properties of Light
Stage Lighting Design, Part 4: Types of Lights