
For the advanced users out there wanting to refine their knowledge on OSC, this latest installment of the Exploring the Network series is written specifically for you.
In my previous articles, I showed the makeup of an OSC packet; how we send one using the IP protocol, describing IP address, ports, and subnet masks and then in further detail spoke about communication protocols such as UDP & TCP. Today I will show you how to transmit and receive OSC from multiple devices.
The Scenario:
You have an Eos family console, one network interface is being used for sACN and multi-console traffic sitting on the 10.101.X.Y network. The other network interface is being used for OSC. You do this because, as we established in OSC Connections, it’s polite to keep lighting specific traffic separate from show communication.
Note: For those unsure of all of this so far, you should start by reading Exploring the Network: The Postcard (OSC) and then the following posts in the series.
Example 1
To start with, you want to connect your tablets or phones to the console with a few 3rd party applications such as Lemur & TouchOSC.

Step 1 – Each device needs a valid IP address. This can either be given by DHCP from either your console or wireless router or set manually in the phone or tablets settings. (Ping each other to confirm connection)
Step 2 – Set the transmit and receive settings on each of the tablets and phones. (All of the devices are transmitting to the Eos’ IP address and receive port. Eos will transmit to a port number, which in this example will be 3001 and the same for all devices)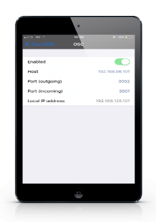
Note: Wondering why I picked those port numbers? Read Exploring the Network: OSC Connections. In short, I picked two random (logical to me) numbers between 1025 and 65535.
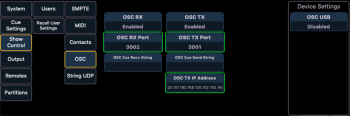
Step 3 – Set the transmit and receive settings within Eos.
Ensure that Eos’ OSC RX Port is the same as the tablets and iPhones transmit or outgoing port settings, as well as Eos’ OSC TX Port being the same as the tablets and iPhone receive or incoming port. Essentially the devices setting should be the reverse of each other!
“How does Eos send OSC messages to different phone and tablets when they have different IP addresses?”
The answer is by typing in multiple IP addresses in the OSC TX IP Address box and using a space delimiter to separate them for example:

Note: For the sake of being thorough and educational, you can set the TX IP Address to be a broadcast IP address e.g. 192.168.255.255. Prior to Eos version 2.8 this was the only method of sending OSC messages to multiple destinations without a 3rd party application (OSC Router). It is not recommended practice now that we have multiple IP destinations implemented in Eos.
As I said in Exploring the Network: The Postman:
“Broadcasting is like shouting at everyone in a room and not caring if they want to hear what you have to say, or like that drunk friend at a party who never knows when to be quiet.”
Example 2

Adding to our first example, we’ve included a mac running QLab and a Disguise Media Server:
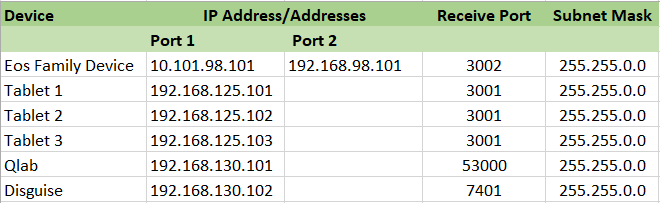
Note: Not all applications have the option to set their OSC receive or “incoming” port number. QLab uses 53000 as it’s receive port and this cannot be changed.
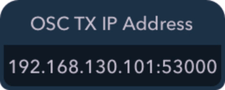
“How does Eos send OSC messages to different applications when they are using different port numbers?”
The answer is by typing the port number after the IP address with a colon delimiter into the OSC TX IP Address Box for example:
In the example above we have three devices that are using the same receive port with QLab and Disguise using different receive ports. By taking advantage of the OSC RX Port setting we can save ourselves some typing.

Note: When a port number is not specified using the colon delimiter, the default port number set in OSC RX Port will be used.
Translation
Sending a few OSC messages from an external link attached to a cue is simple and doesn’t require much work to program into the desk. When there is a requirement such as; QLab should start a cue in its work space whenever Eos fires a cue with the same number, a larger amount of work to program that into the lighting desk could be added.
Before I tell you the trick, let’s take a step back and look at the problem.
A few statements first (not the problem!)
- QLab starts a cue by receiving the OSC Message: /cue/<cue number>/start
- Eos outputs implicit OSC messages when a cue fires in the format: /cue/out/event/cue/<cue list number>/<cue number>/fire
The problem:
- Attaching an external link to a cue with the specific cue number per cue would take forever.
- Eos’ implicit output message is the wrong format for QLab.
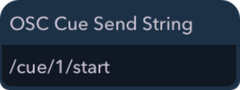
The answer or trick to our problem is by using translation, we need to turn, /cue/out/event/cue/<cue list number>/<cue number>/fire into /cue/<cue number>/start. To do this we use wildcards e.g. %1 and the OSC Cue Send String setting found in Displays -> Settings -> System Settings -> Show Control -> OSC.
The setting tells Eos to output a specific formatted OSC message, inserting cue information where wildcards sit in the string of text whenever a cue is fired.
 Note: Hover your mouse over the OSC Cue Send String box for a tool-tip of the wildcards.
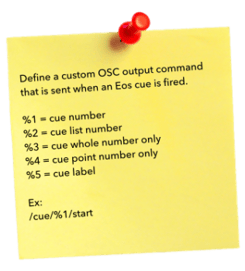
If we don’t want Eos and QLab to be so tightly coupled with the ability to use point number cues as specific lighting moments use “/cue/%3/start”; which would trigger QLab only when a whole number is fired.
The Other Way Around
Eos should fire a cue on its master playback cue list whenever QLab sends a “QLab message”.
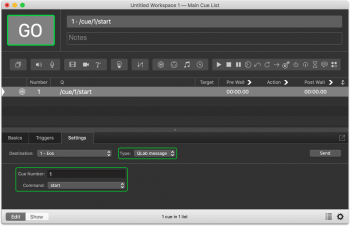
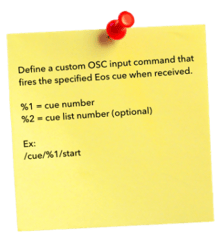
Under the hood a “QLab Message” is an OSC Message formatted in Figure 53’s specific format for their application. Typically, it would be used to control other QLab machines, but to save the time typing the string, /eos/cue/<cue list number>/<cue number>/fire, you can take advantage of Eos’ OSC cue receive string setting.
Found in Displays -> Settings -> System Settings -> Show Control -> OSC.
Set the OSC Cue Receive String to /cue/%1/start
Note: Hover your mouse over the OSC Cue Receive String box for a tool-tip of the wildcards.